Tuesday 24 May 2016

Toyota Landcruiser 200 series, VDJ200R V8 4.5 litre Commonrail 1VD-FTV ECU Flash tuning info...Year 2016

I've gotten a reply from Alpine Lee of Y3 ECU Tuning http://www.y3tuned.com/ with regards to me asking for more info. I was promised more info in a few days time as the team had just returned from another tuning 'marathon' as Alpine likes to call it :-).


My 2008 VDJ200R V8 4.5 litre common rail 1VD-FTV engine had just done 90k+ miles (It's May 24th 2016 Now). It's also received a brand new engine thermostat together with new MAP sensor air filter and associated hoses. The EGR pipe, I've done a full block, which previously would throw CELs after a short drive.


Regrets:
I've done some backyard mods in the past to try and reduce the EGR. My conclusion was not to bother with those mods anymore. Thankfully the holes I've drilled in my air intake were easily reversible with some hard plastics and silicone. The holes drilled in the dual throttles, they were not critical in anyway to affect shutdown vibration or anything else except perhaps in a runaway engine with bad oil leaks coming from damaged turbos. Worst case scenario, engine won't be revving too high with those two 12mm holes.

ECU Flash:
I mentioned that I've asked for a less smoky tune. 840Nm torque is considered a safe tune, without smoke and undesirable EGTs or compromising the autotrans too much according to Y3 ECU Tuning's facebook remarks: https://www.facebook.com/Y3Tuned/photos/?tab=album&album_id=1038654646201864

That 840Nm is a lot!
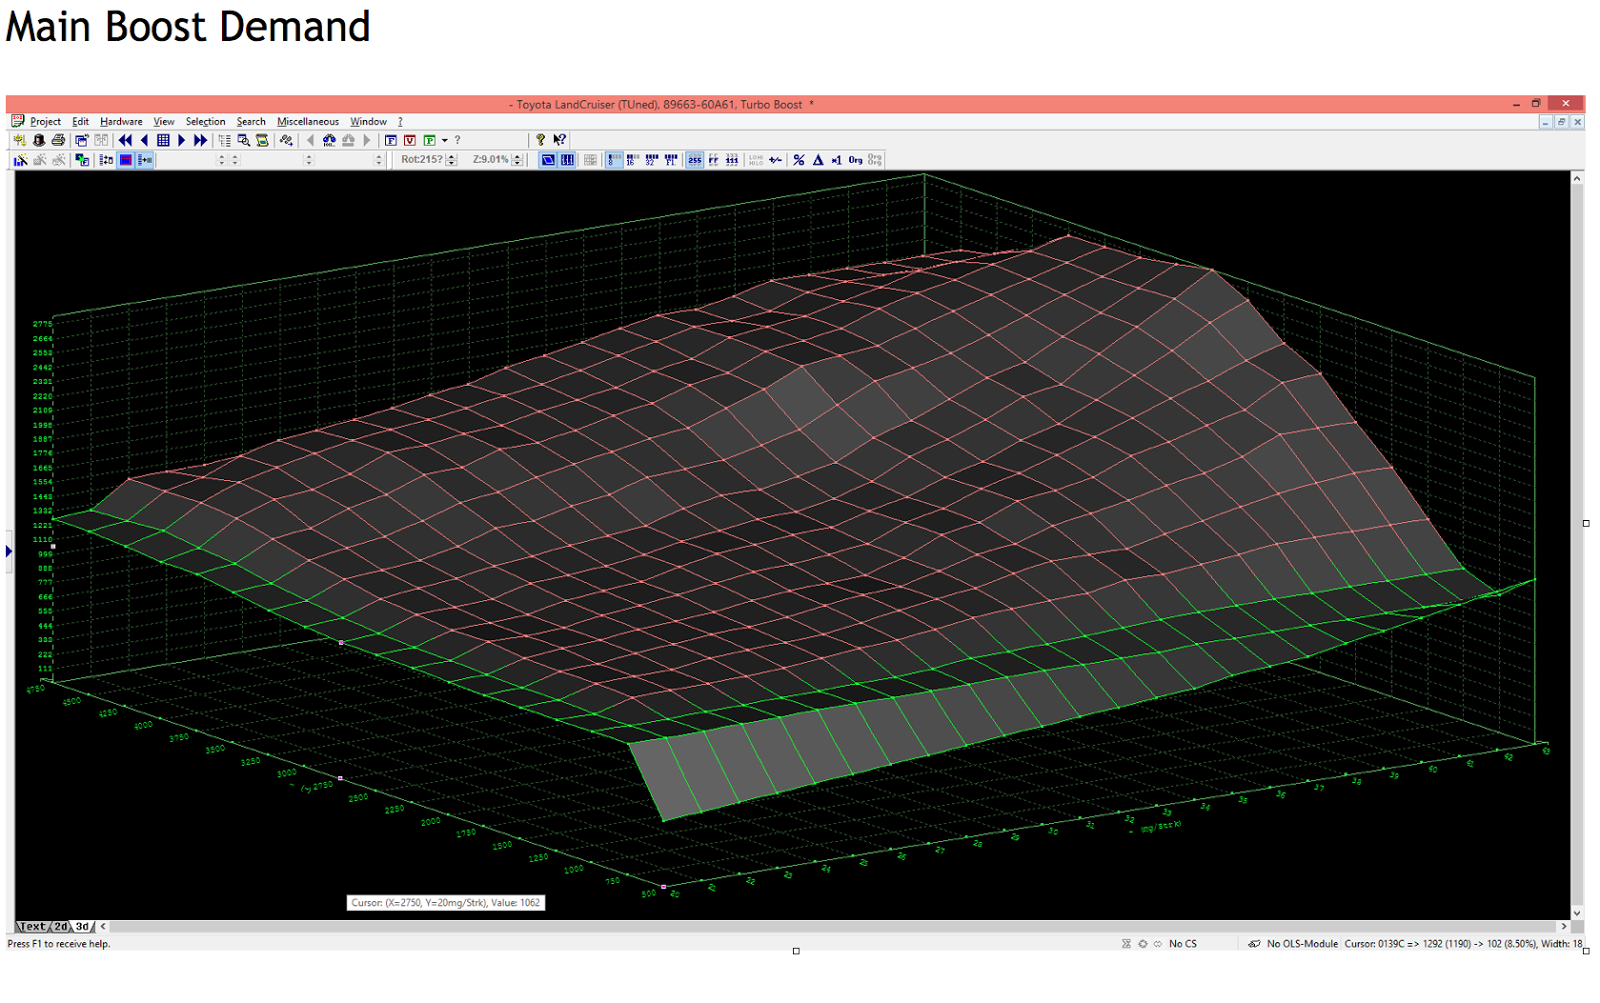
Torque Limiter Map:
Alpine Lee mentioned that:

 "Generally the torque limiter is the final limit of the engine output , no matter how the boost are tweak, injection quantity been adjusted ,
the final cap engine output still control by this limiter."


Yup, in agreement with Youtube: https://www.youtube.com/watch?v=3Vi4M2qJueQ


More to come...

Sunday 22 May 2016

Fine Adjustment of Zilla Bracelet on my Citizen 1000m Autozilla...Part 2...SuppaAutozilla...Year 2016

After 3 weeks on the road with my SuppaAutoZilla I've decided the best possible fit for my Zilla Bracelet as follows:

I've decided the previous adjustment was a touch on the tight side (imprintation of the diving helmet on wrist), so the best move was to add back a single link and using the three micro-adjustment holes provided on the clasp to take up the middle position. In this way, the added link is halved in distance to give the best fit.

A solid titanium link

Angular beauty...


Don't bother with trying to have equal number of links on both sides. I've noted that watch centralise best on top of my left wrist with the clasp similarly centralised at the bottom when the outer (as in away from the body when viewing watch dial) side is longer. In my case, two links longer.

The innermost link took up the middle position on the three adjustment holes of the clasp to provide just enough extra length for a comfortable fit for my hand.


Saturday 21 May 2016

Toyota Landcruiser 200 series, VDJ200R V8 4.5 litre Commonrail 1VD-FTV 100% complete Diesel EGR delete via ecu flash...


I didn't think it was a simple as that, and yet it was done. The best part was this was not an ECU chip replacement technology but the ultimately desirable one of rewriting the stock ROM on my Toyota ECU!

My earlier dreams of trying to disable the EGR of the VDJ200R V8 4.5 Litre common rail 1VD-FTV has come to pass in possibly the cleanest stock looking way!

I've asked for a conservative tune, my original goal being only to disable the EGR completely. As an engine enthusiast, I know what happens when exhaust gas of the diesel combustion variety gets reintroduced back into the intake manifold. Dirty black crusty crumbs of caked up carbon lining the intake manifold and engine ports from being mixed with engine oil blown in from acceptable leaks from the turbochargers and the PCV breather valve.

Of course you'll have to check with the existing laws for on-the-road use. Off-road use should be ok.


1VD-FTV ECU location in the firewall.


The ECU is located on the front passenger side(Right hand drive car) of the engine on the firewall. Remove the three bolts securing a black plastic electrical box at the bottom before removing the 4 bolts on the ECU flange. The two separate plugs are removed by depressing the plastic arm ends lock tab and rotating the plastic arm towards the edge.

These are the EDUs...no need to remove.


The longer plug is on top. Remember this when reinstalling the ECU back into the slot.

Yes, this ECU can be reflashed without a chip change. Clean and sanitary.


Previous attempt at EGR reduction.


Thought I'll clean the pipe of carbon so that the next time I open it again I'd expect it to remain clean as the EGR reduction to nil should be working without CELs coming on.

Just to be doubly sure I decided to fully block one end of the EGR pipe with a 34mm block plug lest any of the two EGR valves be leaking (Known to be a problem!).

Packed my 1VD-FTV ECU in a sealed plastic bag and couriered it to the professionals.
The wizards Whatsapped me some progress pictures as they worked on the ECU...

 These wires were connected to enable rewriting of the Toyota ROM...

Injector Opening duration. I mentioned earlier in the blog if they tuned with increased injector pressure and their reply was in addition to duration and timing changes! That's very pro in the world of diesel tuning...much like what is available with standalone performance diesel ECUs available from Thailand for your D-Max, Vigos, Tritons, etc....

I especially requested for a conservative (with less smoke at the expense of power) tune, wanting my autotrans to survive longer for my enjoyment!


VGT boost pressure under electronic control could be raised a bit! Stock Toyota shows the 1VD-FTV boost to peak at about 2.1 bar absolute meaning a boost pressure of 1.1 bar subtracting atmospheric pressure deemed at 1 bar. The maps above have raised that to useful high of 1.2-1.6 bar on a good power pull!

Torque limiter...I really do not know what this is until I ask the tuners...My only conjecture was that the tuners had opened up the autotrans portion of the ECU and reprogrammed the stock transmission lock up parameters! Wow! If that is...so until the next blog!

Got the ECU back yesterday...and in the midst of replacing my bad thermostat I also refitted it with the fully blocked EGR pipe. Got it started and it was a beauty!


Car started without any problems and give me time to test if any CELs pop on...


Driving impression: Feels just like a VW V10 TDI Touareg in the torque department. More to come when I've taken it for both a high altitude and long distance drive to the East coast! The boost of the turbo could be heard as one revs the engine gently from idle...yummy!


More to come...

Sunday 15 May 2016

Toyota Landcruiser 200 series, VDJ200R V8 4.5 litre Commonrail 1VD-FTV Diesel EGR Blank/Delete/Reduce...High altitude power loss and water temperature was up 2 notches on the gauge!

My VDJ200R had done 90k miles and I've been having this "power loss" at high altitude problem.

My last two posts of discovering problems with the MAP sensor that was fed boost from the intake manifold and subsequent replacement of the MAP sensor hoses and air/oil filter did not completely resolved the problem!

It did help in restoring the car to shift earlier and was very good at close to sea-level cruising with the auto trans engaging, IMO, correctly!

Just yesterday, I returned from another high altitude trip and this time I nailed another clue! At the point of experiencing power loss I noticed my water temp gauge was up a notch or two! As soon as I gently give the LC200 a chance to let the temperature drop back down two notches, the car regained power!


I thought about the thermostat, first thing!


Viscous heater pump with magnetic clutch removed...after this it was easy to get at two bolts securing the steel pipe ending at the left hand side(view from front to rear of vehicle) of the thermostat housing. I did not even have to remove the thicker serpentine belt as the two bolts (12mm metric) securing the radiator steel pipe were accessible without too much difficulty!

Never having taken off the thermostat before, I thought that the removal was easy peasy until I discovered that the housing was built in to the water pump! In retrospect I would not have needed to removed any of the pipes on the right(view from the above!) of the thermostat housing! After removing the smaller width belt, the viscous heater pump assembly (see top pic) was removed.
Part No.16321 (Steel pipe) has two bolts top and bottom along the pipe(in addition to the other two at the thermostat flange)...loosen them and the pipe can be wiggled to remove the thermostat without having to remove the serpentine belt and other stuff.

This golden radiator steel pipe is your easiest path to removing the thermostat short of having to remove the entire water pump plus the serpentine belt and a whole host of other stuff!


Jiggle the radiator steel pipe a little and the thermostat was removed. Part of the rubber lips were deteriorated and missing! In the engine block I presume. There should also be a rubber gasket surrounding this thermostat. Buy a new one!

Boiled a kettle of hot water and poured it into a container with the old thermostat.

Dead thermostat. It didn't move much.
My thinking was that the water temperature played an important part in the safety feature of this 1VD-FTV. When temperatures get abnormally high, the ecu cuts injector duration or pressure, either way to save the engine!

At least that's what I think....now before jumping to conclusion I'll like to fit everything back plus a new thermostat and give it another high altitude run!

Check back later....

Wednesday 11 May 2016

Toyota Landcruiser 200 series, VDJ200R V8 4.5 litre Commonrail 1VD-FTV Diesel EGR Blank/Delete/Reduce...High altitude power loss...

I did mentioned that I had earlier trouble with power loss at high altitude (above 1000m) of the 1VD-FTV.

Symptoms are next to no boost and lack of response. At sea-level, the 4.5litre V8 may hide somewhat the power loss given its reasonable torque even normally aspirated. One can notice that gear changes will be at higher rpm though. Only at high altitude would one really feel that power loss as the car would be "anemic" and your foot would be on the floor just to keep the car crawling.

So I decided to take off the intercooler and check again...and the first thing I noticed was that the boost feed going to that little plastic oil filter had a rather halfway inserted loose connection. Yes...it was leaking from a loose hose connection.


Check this oil filter to ensure that it is not cracked anyway. It may be hard to see. I had mine replaced.


From engine intake is this boost hose that goes to the MAP sensor.


Moral of this story...ensure the rubber/silicone/vaccum/boost hose is long enough and tight fitting enough both coming from the engine intake and passing the filter and going into the MAP sensor. Power was restored like new.


Saturday 7 May 2016

Scratches and fit of my brand new Zilla Bracelet and Citizen 1000m Autozilla after 1 week on the road...Year 2016

The brushed finishing on my Zilla Bracelet after a week of real down to earth but careful kind of use...

Stainless steel clasp has couple of scratches. One reason for the brushed finishing to help hide them.


Links have minor scratches which are somewhat hidden by the brushed finish. The unseen wear and tear is in the interlink rotation and double ended screw cap bars contact! After six months I'll like to review this again!

Titanium adapter ends has some scratches. The curved end solid links has some inevitable titanium to titanium rubbing contact or polishing, for a better word. This is better than titanium to stainless steel contact which will definitely result in very apparent looking scratches.

Here we have a titanium link end that has minor scratching as it was previously adjusted to be halfway into the stainless steel clasp cover.

The bracelet end that joins to the clasp end with three fine adjustment holes per side has some titanium to stainless steel contact, not really scratches!
Duratect is protecting the watch case well! So far no major banging into any walls or metal. No intentions to!

Also showing the fit of the Zilla Bracelet on my hand and the scratches from when one rests the hand on table tops.

A good fit, IMO.

Comfortable yet tight enough.
Minor skin marks from fit of bracelet.

Where the clasp sits.

Diving helmet imprintation. :-)
So far so good. I would reckon the bracelet fit is good. Some may be shocked by the temporary skin imprintation. I am keeping a close watch and adjustments can be made anytime I "feel" uncomfortable.

Until then...Cheers!

Friday 6 May 2016

Fine Adjustment of Zilla Bracelet on my Citizen 1000m Autozilla...SuppaAutozilla...Year 2016

I've had my Zilla Bracelet last adjusted about 6 days ago. It was a bit on the loose side. The watch could slide along my wrist about an inch and a half in the early morning and tighten up a bit more by midday. Still a touch too loose, IMO.


I have had the last link in the bracelet that ends in the clasp end with three fine adjustment holes shifted to the inner most hole. Watch felt fine after that but I noticed that the second last link being shifted halfway into the clasp cover got a little scratched from friction. Knowing that titanium tends to grab at other metals, this being a stainless steel clasp, I thought it makes sense to remove an extra link and shift the adjustment back out to the outermost hole. This would eliminate the scrubbing contact between the 2nd last link and the clasp cover end.


Out came my trusty modified(thinned down to fit) 1.8mm screw driver (two of them) and out came the link. Weight of my SuppaAutoZilla had dropped from the last bracelet adjustment of 222g to a current 218g.